11 Connect to GitHub
Objective: make sure that you can pull from and push to GitHub from your computer.
I do not explain all the shell (Appendix A) and Git commands in detail. This is a black box diagnostic / configuration exercise. In later chapters and in live workshops, we revisit these operations with much more narrative and discussion of alternative workflows.
I assume you’ve decided whether to use HTTPS (see chapter 9) or SSH (see chapter 10) and you’ve prepared your credential.
11.1 Make a repo on GitHub
Go to https://github.com and make sure you are logged in.
Near “Repositories”, click the big green “New” button. Or, if you are on your own profile page, click on “Repositories”, then click the big green “New” button.
How to fill this in:
- Repository template: No template.
- Repository name:
myrepoor whatever you wish (we’ll delete this soon). - Description: “Repository for testing my Git/GitHub setup” or similar. It’s nice to have something here, so you’ll see it appear in the README.
- Public.
- Initialize this repository with: Add a README file.
Click the big green button that says “Create repository”.
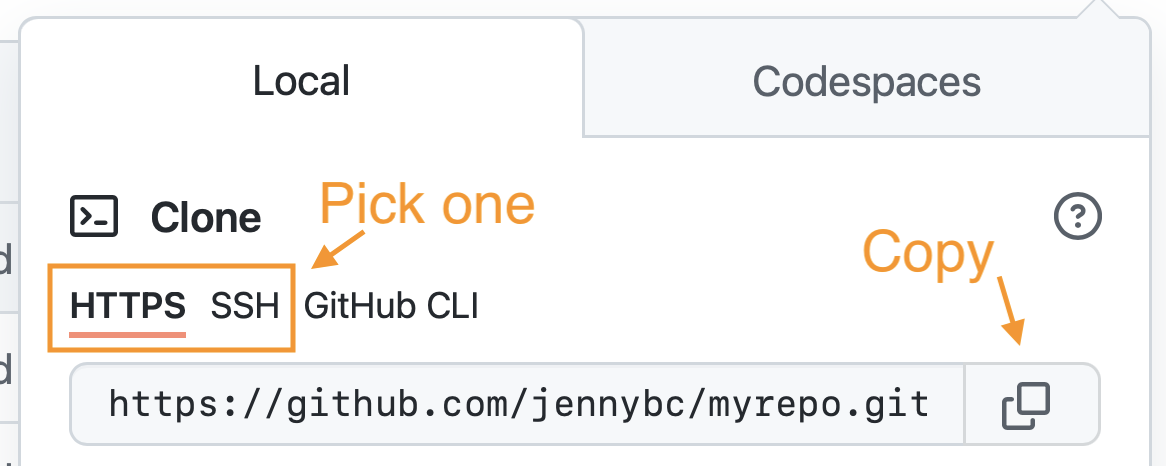
Now click the big green button that says “<> Code”.
Copy a clone URL to your clipboard. If you’re taking our default advice, copy the HTTPS URL. But if you’re opting for SSH, then make sure to copy the SSH URL.
11.2 Clone the repo to your local computer
We have a few ways to do this. Here we use command line Git. In section 15, we show other methods that you might prefer in daily life: using usethis or the RStudio IDE.
Go to the shell (Appendix A).
Take charge of – or at least notice! – what directory you’re in.
pwd displays the working directory.
cd is the command to change directory.
Personally, I would do this sort of thing in ~/tmp.
Clone myrepo from GitHub to your computer.
Use the URL we just copied from GitHub.
This URL should have your GitHub username and the name of your practice repo.
If your shell (Appendix A) cooperates, you should be able to paste the whole https://.... bit that we copied above.
But some shells are not (immediately) clipboard aware.
In that sad case, you must type it. Accurately.
git clone https://github.com/YOUR-USERNAME/YOUR-REPOSITORY.gitThis should look something like this:
~/tmp % git clone https://github.com/jennybc/myrepo.git
Cloning into 'myrepo'...
remote: Enumerating objects: 3, done.
remote: Counting objects: 100% (3/3), done.
remote: Total 3 (delta 0), reused 0 (delta 0), pack-reused 0
Receiving objects: 100% (3/3), done.
Make this new repo your working directory, list its files, display the README, and get some information on its connection to GitHub:
cd myrepo
ls
head README.md
git remote show origin
This should look something like this:
~/tmp % cd myrepo

~/tmp/myrepo % ls
README.md

~/tmp/myrepo % head README.md
# myrepo
checking stuff for Happy Git

~/tmp/myrepo % git remote show origin
* remote origin
  Fetch URL: https://github.com/jennybc/myrepo.git
  Push  URL: https://github.com/jennybc/myrepo.git
  HEAD branch: main
  Remote branch:
    main tracked
  Local branch configured for 'git pull':
    main merges with remote main
  Local ref configured for 'git push':
    main pushes to main (up to date)
11.3 Make a local change, commit, and push
Add a line to README and verify that Git notices the change:
echo "A line I wrote on my local computer  " >> README.md
git status
This should look something like this:
~/tmp/myrepo % echo "A line I wrote on my local computer" >> README.md

~/tmp/myrepo % git status
On branch main
Your branch is up to date with 'origin/main'.

Changes not staged for commit:
  (use "git add <file>..." to update what will be committed)
  (use "git restore <file>..." to discard changes in working directory)
        modified:   README.md

no changes added to commit (use "git add" and/or "git commit -a")
Stage (“add”) and commit this change and push to your remote repo on GitHub.
If you’re a new GitHub user and using HTTPS, you might be challenged for your username and password.
Even though GitHub no longer allows username/password authentication, many general Git tools still frame the authentication task with this vocabulary.
By all means, provide your GitHub username when prompted.
However, the most critical piece is to provide your PAT as the password.
Do not enter your web password.
Enter your PAT.
If you already stored your PAT with gitcreds::gitcreds_set(), it should be discovered automatically and you will not see a credential challenge.
git add README.md
git commit -m "A commit from my local computer"
git push
This should look something like this:
~/tmp/myrepo % git add README.md

~/tmp/myrepo % git commit -m "A commit from my local computer"
[main e92528c] A commit from my local computer
 1 file changed, 1 insertion(+)

~/tmp/myrepo % git push
Enumerating objects: 5, done.
Counting objects: 100% (5/5), done.
Delta compression using up to 12 threads
Compressing objects: 100% (2/2), done.
Writing objects: 100% (3/3), 327 bytes | 327.00 KiB/s, done.
Total 3 (delta 0), reused 0 (delta 0), pack-reused 0
To https://github.com/jennybc/myrepo.git
   31dcaef..e92528c  main -> main
Do you see an error like this?
~/tmp/myrepo % git push
remote: Support for password authentication was removed on August 13, 2021. Please use a personal access token instead.
remote: Please see https://github.blog/2020-12-15-token-authentication-requirements-for-git-operations/ for more information.
fatal: Authentication failed for 'https://github.com/jennybc/myrepo.git/'
This means you have provided your GitHub web password, instead of your personal access token (PAT).
Go back to chapter 9 to get a PAT.
Try git push again and hopefully you’ll get another prompt, allowing you to correct things and provide your PAT.
If you ever feel you need to overwrite a bad credential with a new one, the easiest way to do this is to call gitcreds::gitcreds_set() from R.
11.3.1 Windows and line endings
On Windows, you might see a message about LF will be replaced by CRLF. This is normal and does not require any action on your part.
Windows handles line endings differently from other operating systems, but the default setup for Git for Windows is appropriate for most people and situations.
Here’s a command to reveal the current line ending configuration and some typical output on Windows:
$ git config --show-origin --get core.autocrlf
file:"C:\\ProgramData/Git/config"      true
If your value shows as false, you can set it to true with this command:
$ git config --global core.autocrlf truetrue is the current default setting for core.autocrlf for Git for Windows, our recommended method for installing Git on Windows.
The need to set this explicitly in your global user config suggests you should consider reinstalling or updating Git for Windows.
11.4 Confirm the local change propagated to the GitHub remote
Go back to the browser. I assume we’re still viewing your new GitHub repo.
Refresh.
You should see the new “A line I wrote on my local computer” in the README.
If you click on “commits,” you should see one with the message “A commit from my local computer.”
If you have made it this far, you and your test repo are ready to graduate to using Git and GitHub with RStudio (chapter 12).
11.5 Clean up
If you’re ready to conclude this test of your Git installation and GitHub configuration, we can clean up the test repository now.
Local When you’re ready to clean up, you can delete the local repo any way you like. It’s just a regular directory on your computer.
Here’s how to do that in the shell, if current working directory is myrepo:
cd ..
rm -rf myrepo/
GitHub In the browser, go to your repo’s landing page on GitHub. Click on “Settings”.
Scroll down, click on “delete repository,” and do as it asks.