12 Connect RStudio to Git and GitHub
Here we verify that RStudio can issue Git commands on your behalf. Assuming that you’ve gotten local Git to talk to GitHub, this means you’ll also be able to pull from and push to GitHub from RStudio.
In later chapters and in live workshops, we revisit these operations with much more explanation.
If you succeed here, your set up is DONE.
12.1 Prerequisites
We assume the following:
- You’ve registered a free GitHub account (chapter 4).
- You’ve installed/updated R and RStudio (chapter 5).
- You’ve installed Git (chapter 6).
- You’ve introduced yourself to Git (chapter 7).
- You’ve confirmed that you can push to / pull from GitHub from the command line (chapter 11).
You will also need a test repository on GitHub. If you don’t have a suitable test repository on GitHub, follow the instructions in the next section.
If you just completed the previous chapter, Connect to GitHub, that repo will be perfect! However, I encourage you to delete the local repository, so you can experience how we use RStudio to clone it and get a local copy. This is a actually a workflow we refer to elsewhere (see 37 as “burn it all down”. It’s a deeply pragmatic coping strategy if your local Git repo is goofed up, but the version on GitHub is pretty current.
Delete the folder corresponding to the local repo any way you like.
It’s just a regular directory on your computer.
Here’s how to do that in the shell, if current working directory is myrepo:
cd ..
rm -rf myrepo/
12.2 Make a repo on GitHub
Go to https://github.com and make sure you are logged in.
Near “Repositories”, click the big green “New” button. Or, if you are on your own profile page, click on “Repositories”, then click the big green “New” button.
How to fill this in:
- Repository template: No template.
- Repository name:
myrepoor whatever you wish (we’ll delete this soon). - Description: “Repository for testing my Git/GitHub setup” or similar. It’s nice to have something here, so you’ll see it appear in the README.
- Public.
- Initialize this repository with: Add a README file.
Click the big green button that says “Create repository”.
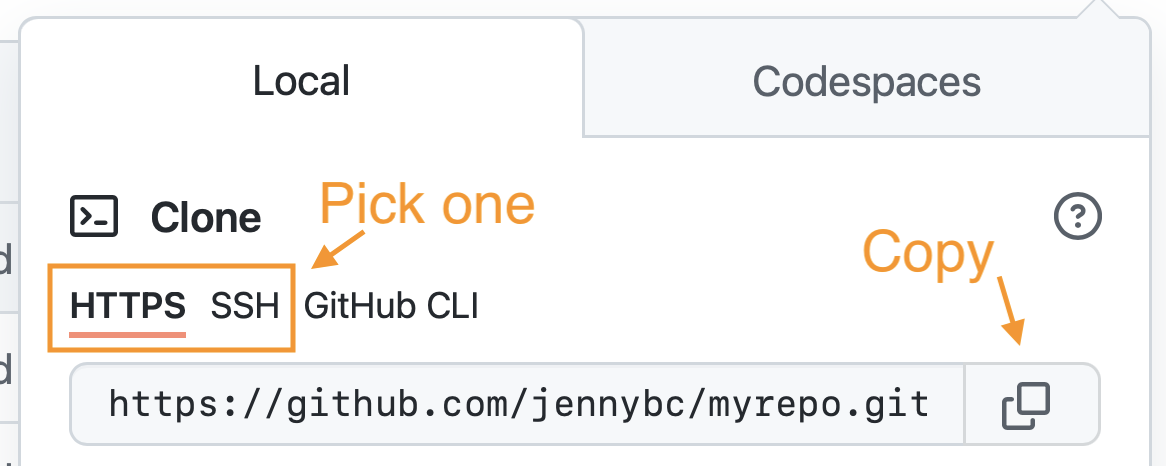
Now click the big green button that says “<> Code”.
Copy a clone URL to your clipboard. If you’re taking our default advice, copy the HTTPS URL. But if you’re opting for SSH, then make sure to copy the SSH URL.
12.3 Clone the test GitHub repository to your computer via RStudio
In RStudio, start a new Project:
-
File > New Project > Version Control > Git. In “Repository URL”, paste the URL of your new GitHub repository. It will be something like this
https://github.com/jennybc/myrepo.git.- Do you NOT see an option to get the Project from Version Control? Restart RStudio and try again. Still no luck? Go to chapter 13 for tips on how to help RStudio find Git.
- Accept the default project directory name, e.g.
myrepo, which coincides with the GitHub repo name. - Take charge of – or at least notice! – where the Project will be saved locally. A common rookie mistake is to have no idea where you are saving files or what your working directory is. Pay attention. Be intentional. Personally, I would do this in
~/tmp. - I suggest you check “Open in new session”, as that’s what you’ll usually do in real life.
- Click “Create Project”.
You should find yourself in a new local RStudio Project that represents your test repo on GitHub.
This should download the README.md file from GitHub.
Look in RStudio’s file browser pane for the README.md file.
12.4 Make local changes, save, commit
From RStudio, modify the README.md file, e.g., by adding the line “This is a line from RStudio”. Save your changes.
Commit these changes to your local repo. How?
From RStudio:
- Click the “Git” tab in upper right pane.
- Check “Staged” box for
README.md. - If you’re not already in the Git pop-up, click “Commit”.
- Type a message in “Commit message”, such as “Commit from RStudio”.
- Click “Commit”.
12.5 Push your local changes online to GitHub
Click the green “Push” button to send your local changes to GitHub.
You should not experience a credential challenge, since one of the pre-requisites was successfully pushing to GitHub from the command line (chapter 11). RStudio’s Git pane just exposes a specific subset of command line Git and therefore once your credentials work in the shell, they should work in RStudio. If you do experience a credential challenge, that suggests you should have a look at the troubleshooting suggestions for your chosen protocol, either HTTPS or SSH.
12.6 Confirm the local change propagated to the GitHub remote
Go back to the browser. I assume we’re still viewing your new GitHub repo.
Refresh.
You should see the new “This is a line from RStudio” in the README.
If you click on “commits”, you should see one with the message “Commit from RStudio”.
If you have made it this far, you are DONE with set up. Congratulations!
12.7 Clean up
Quit the RStudio instance that’s open to your test Project / Git repo.
Delete the local repo any way you like. It’s just a regular directory on your computer.
Here’s how to do that in the shell, if current working directory is myrepo:
cd ..
rm -rf myrepo/
In the browser, go to your repo’s landing page on GitHub. Click on “Settings”.
Scroll down, click on “delete repository,” and do as it asks.