16 Existing project, GitHub first
This is a novice-friendly workflow for bringing an existing R project into the RStudio and Git/GitHub universe.
We do this in a slightly goofy way, in order to avoid using Git at the command line. You won’t want to work this way forever, but it’s perfectly fine as you’re getting started! At first, the main goal is to accumulate some experience and momentum. There is nothing goofy about the GitHub repo that this creates, it is completely standard. Transition to a more elegant process when you’re ready.
We assume you’ve got your existing R project isolated in a directory on your computer. If that’s not already true, make it so. Create a directory and marshal all the existing data and R scripts there. It doesn’t really matter where you do this, but note where the project currently lives.
16.1 Make a repo on GitHub
Go to https://github.com and make sure you are logged in.
Near “Repositories”, click the big green “New” button. Or, if you are on your own profile page, click on “Repositories”, then click the big green “New” button.
How to fill this in:
- Repository template: No template.
- Repository name:
myrepoor a similarly short name for this existing project. Approach this similar to a variable name, in code: descriptive but brief, no whitespace. Letters, digits,-,., or_are allowed. - Description: “Analysis of the stuff” or any short description of the project. Write this for humans.
- Public.
- Initialize this repository with: Add a README file.
Click the big green button that says “Create repository”.
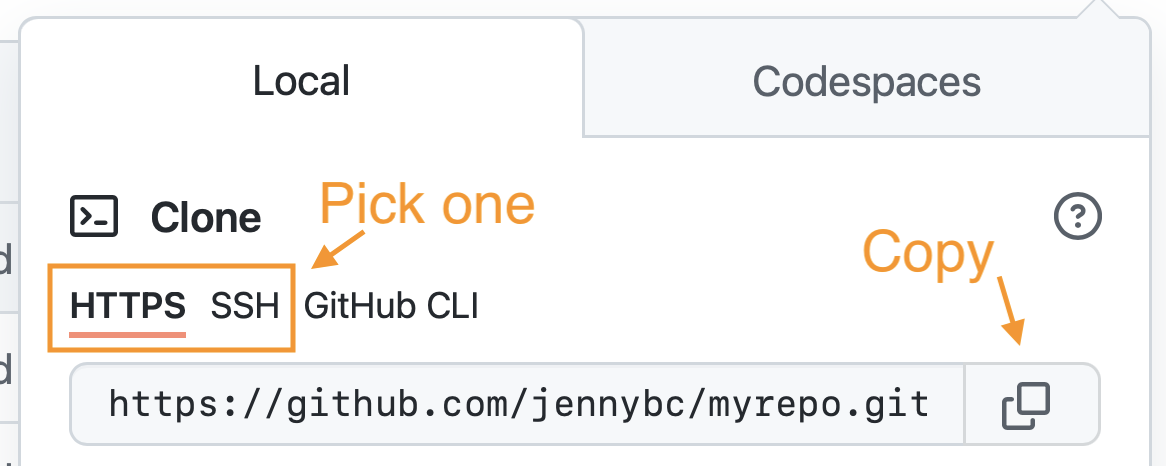
Now click the big green button that says “<> Code”.
Copy a clone URL to your clipboard. If you’re taking our default advice, copy the HTTPS URL. But if you’re opting for SSH, then make sure to copy the SSH URL.
16.2 New RStudio Project via git clone
I present two ways to do this:
usethis::create_from_github()- Via the RStudio IDE
(Recall that we showed how to do this with command line Git in chapter 11.)
When you are cloning your own GitHub repository, the two methods are equivalent.
In other scenarios, especially fork-and-clone (chapter 31), I think usethis::create_from_github() is superior, because it does additional, recommended setup.
Pick one of these methods below.
16.2.1 usethis::create_from_github()
You can execute this command in any R session. If you use RStudio, then do this in the R console of any RStudio instance.
usethis::create_from_github(
  "https://github.com/YOU/YOUR_REPO.git",
  destdir = "~/path/to/where/you/want/the/local/repo/"
)
The first argument is repo_spec and it accepts the GitHub repo specification in various forms.
In particular, you can use the URL we just copied from GitHub.
The destdir argument specifies the parent directory where you want the new folder (and local Git repo) to live.
If you don’t specify destdir, usethis defaults to some very conspicuous place, like your desktop.
If you like to keep Git repos in a certain folder on your computer, you can personalize this default by setting the usethis.destdir option in your .Rprofile.
We’re accepting the default behaviour of two other arguments, rstudio and open, because that’s what most people will want.
For example, for an RStudio user, create_from_github() does this:
- Creates a new local directory in
destdir, which is all of these things:- a directory or folder on your computer
- a Git repository, linked to a remote GitHub repository
- an RStudio Project
- Opens a new RStudio instance in the new Project
- In the absence of other constraints, I suggest that all of your R projects have exactly this set-up.
16.2.2 RStudio IDE
In RStudio, start a new Project:
-
File > New Project > Version Control > Git. In the “repository URL” paste
the URL of your new GitHub repository. It will be something like this
https://github.com/jennybc/myrepo.git. - Be intentional about where you create this Project.
- I suggest you “Open in new session”.
- Click “Create Project” to create a new directory, which will be all of these things:
- a directory or “folder” on your computer
- a Git repository, linked to a remote GitHub repository
- an RStudio Project
- In the absence of other constraints, I suggest that all of your R projects have exactly this set-up.
This should download the README.md file that we created on GitHub in the previous step.
Look in RStudio’s file browser pane for the README.md file.
Behind the scenes, RStudio has done this for you:
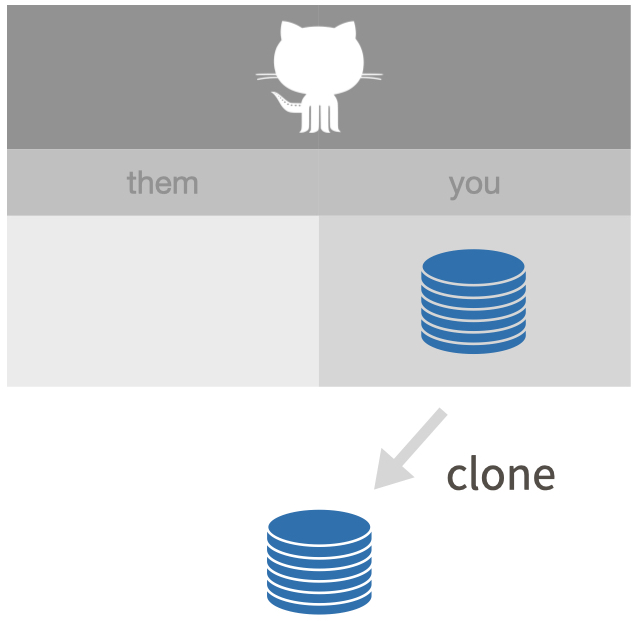
git clone https://github.com/jennybc/myrepo.git16.3 Bring your existing project over
Using your favorite method of moving or copying files, copy the files that constitute your existing project into the directory for this new project.
In RStudio, consult the Git pane and the file browser.
- Are you seeing all the files? They should be here if your move/copy was successful.
- Are they showing up in the Git pane with questions marks? They should be appearing as new untracked files.
16.4 Stage and commit
Commit your files to this repo. How?
- Click the “Git” tab in upper right pane
- Check the “Staged” box for all files that you want to commit.
- Default: stage it.
- When to reconsider: this will all go to GitHub. Consider if that is
appropriate for each file. You can absolutely keep a file locally,
without committing it to the Git repo and sending to GitHub. Just let it
sit there in your Git pane, without being staged. No harm will be done. If
this is a long-term situation, list the file in
.gitignore.
- If you’re not already in the Git pop-up, click “Commit”
- Type a message in “Commit message”, such as “Init project XYZ”.
- Click “Commit”
16.5 Push your local changes to GitHub
Click the green “Push” button to send your local changes to GitHub. RStudio will display something like:
>>> /usr/bin/git push origin HEAD:refs/heads/main
To https://github.com/jennybc/myrepo.git
   3a2171f..6d58539  HEAD -> main
16.6 Confirm the local change propagated to the GitHub remote
Go back to the browser. I assume we’re still viewing your new GitHub repo.
Refresh.
You should see all the project files you committed there.
If you click on “commits,” you should see one with the message you used, e.g. “Init project XYZ”.
16.7 The end
Now just “lather, rinse, repeat”. Do work somewhere: locally or on GitHub. Commit it. Push it or pull it, depending on where you did the work, but get local and remote “synced up”. Repeat.
Note that in general (and especially in future when collaborating with other developers) you will usually need to pull changes from the remote (GitHub) before pushing the local changes you have made. For this reason, it’s a good idea to try and get into the habit of pulling before you attempt to push.